|

|
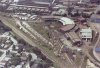
Godfrey Hall took these photos of the Chatham Street roundhouse and Aberdeen
Yard at 12:00 pm on August 1 1982. Godfrey took the shots from a helicopter
at an altitude of approximately 1000 feet; he took the shots while covering
the 1st Anniversary of Limeridge Mall.
Many thanks to Godfrey for sharing these photos! Thanks, too, to Lance
Brown for his comments about yard activites and the construction date
for the piggyback facilities.
In the photo of the Chatham Street shops, note the geeps and SW9 on the
turntable leads. The TOFC tracks in front of the turntable are clearly
visible.
|
|
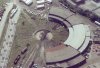
An overhead view of the roundhouse and turntable. Photo by Godfrey Hall. |
|
Another view of the roundhouse. Photo by Godfrey Hall.
Lance Brown noted on the TH&B Mailing List that the piggyback facilities
at the roundhouse were built in 1963.
|
|
|
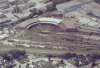
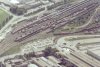
An aerial view of Aberdeen Yard. Photo by Godfrey Hall.
Concerning yard activity at the time the photo was taken, Lance Brown
notes --
"Generally around noon Assignment #1, the 0700 Aberdeen Yard Engine,
would begin marshalling the outbound beltdrags for the afternoon assignments.
Usually this was the only engine in Aberdeen at that time of day."
|
|
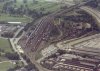
Another view of Aberdeen Yard. Look at the Hamilton Street Railway bus
parked in the bus loop near the road intersection. Above the bus is a grey
cylindrical hopper. On the track above the hopper is snowplow X786. Photo
by Godfrey Hall. |
|
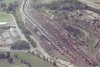
Another view of Aberdeen Yard. The red machines on flatcars (stretching
from the bottom-right to the centre of the photo) appear to be combines.
Also note the large number of boxcars parked near the car shops in the upper-right
of the photo. Photo by Godfrey Hall. |
|
This composite shows the position of Aberdeen Yard and the Chatham Street
facilities in relation to one another. Photos by Godfrey Hall. |
|
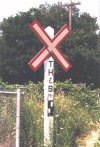
The typical railway crossing sign used by the TH&B on grade crossings
without gates or flashing lights. Photo by Morgan Turney, 1987. |
|
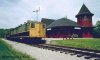
Sulphur Springs Station, situated on or near the site of TH&B station
"Mineral Springs" in the Dundas Valley Conservation Area. The
station and the former CN and CP passenger cars serve as the trail centre.
Photo by Ken Brown. |
|
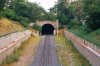
The west portal of the Hunter Street tunnel. Photo taken 10 August, 1997,
from the Nicholas Russon collection. |
|
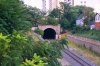
The west portal of the Hunter Street tunnel. Photo taken 10 August, 1997,
from the Nicholas Russon collection. |
|
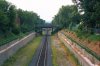
The approach to the Hunter Street tunnel, taken from the (now pedestrian-only)
bridge at Pearl Avenue. Photo taken 10 August, 1997, from the Nicholas Russon
collection. |
|
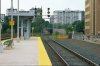
The eastern portal of the Hunter Street tunnel, taken from the platform
at Hunter Street station (now the Hamilton GO Centre). Photo taken 10 August,
1997, from the Nicholas Russon collection. |
|
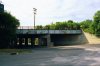
The bridge crossing Aberdeen Avenue, leading to the yard. Photo taken
10 August, 1997, from the Nicholas Russon collection. |
|
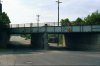
A more head-on photo of the Aberdeen Avenue bridge. Photo taken 10 August,
1997, from the Nicholas Russon collection. |