 |
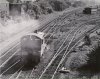
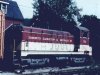
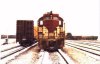
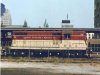
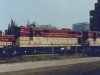
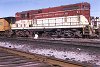
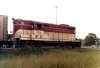
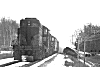
One of the switchers viewed from the Chatham Street bridge in Hamilton.
Photo from the John Hudak collection |
|
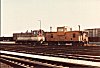
#51 in Hamilton during 1984 was photographed by Willie Smith, the sysop
of the Rails West BBS in Calgary. |
|
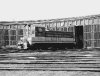
A view of #51 at the Chatham St. roundhouse from the John Hudak collection. |

|
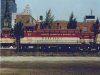
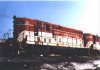
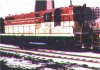
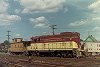
Another shot of #51 in very rusty condition, this one from the Morgan
Turney collection. |
|
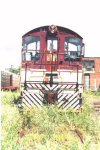
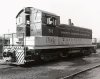
An end-shot of #51 taken by Jim Charlton, from the Morgan Turney collection. |
|
Bob Lawrence visited the TH&B during 1973. There was a strike at the
time, so he found most of the fleet sitting waiting for a photographer to
come along. Here is a photo of #54 at ?Wentworth? crossing. From the Robert
C. Lawrence collection. |
|
Here is another photo of #54, this one at the Hunter Street platform.
From the Robert C. Lawrence collection. |
|
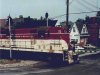
Bob also caught #55 beside the platform in Hamilton. From the Robert C.
Lawrence collection. |
|
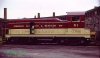
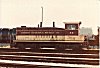
A view of SW9 #56 from the John Hudak collection |

|
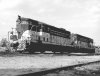
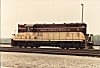
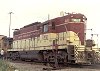
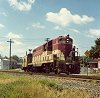
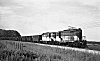
Morgan Turney took this photo of GP7 number 72 in April of 1982. |
|
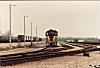
Morgan Turney found number 72 idling at Welland, Ontario in February,
1970. |
|
Number 72 leading GP9 #403 in a Bill Turner photo from the Morgan Turney
collection. |
|
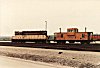
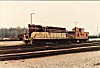
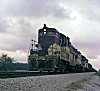
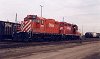
Number 72 was photographed back-to-back with number 76 by Bob Lawrence
during the strike of 1973 in Hamilton. From the Robert C. Lawrence collection. |
|
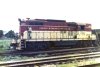
Number 73 was photographed by Bob Lawrence in 1973. From the Robert C.
Lawrence collection. |
|
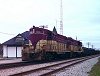
Number 74 at the platform in Hamilton during the 1973 strike. From the
Robert C. Lawrence collection. |
|
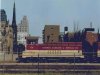
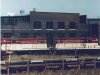
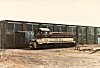
A nice shot of GP7 #74 in relatively new paint, just below the CN Tower,
near Union Station in Toronto. Photographed by Bill Turner, from the Morgan
Turney collection. |
|
Unit 75 leading number 72 in another photo from the John Hudak collection. |
|
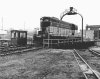
Number 76 on the turntable from the John Hudak collection. |
|
Number 77 at the platform in Hamilton during the 1973 strike. From the
Robert C. Lawrence collection. |
| |
Mel McInnis has sent us some great portraits of TH&B locomotives and vans.
Thanks very much to Mel for sharing these photos with us.
|
|
Number 74 with van 82 at Welland. |
|
Number 74 in the yard at Welland. |
|
Number 52 in Hamilton. |
|
Number 56 with van 83. |
|
Number 56 in Welland. |
|
Number 74 in Welland. |
|
Number 74 with van 82 in Welland. |
| |
Louis Nemeth caught these two photos of #71 with van #72 at the Canadian Furnace
yards in Port Colborne, Ontario, in 1974.
|
|
TH&B # 71 in Port Colborne in 1974, resting at the
Canadian Furnace yards. |
|
Number 77 in Port Colborne, July 28 1972. |
|
Number 401 in Port Colborne on July 25 1972, getting
ready to haul freight to Hamilton. |
|
Number 402 in Welland, heading for Port Colborne, July
26 1972 at 12:45 pm. |
|
Number 76 in Port Colborne, July 24 1972. |
| |
Daryl Sherlock has sent along some more great photos. The comments below are
Daryl's. |
|
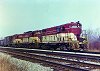
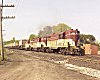
GP7 71 GP9 401 & GP7 73 westbound at Sumbler Road
near Fenwick. |
|
GP7 71 & GP9's 401 &402 at Hewitt heading for
Welland yard. |
|
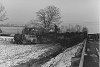
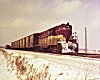
GP7's 72 & 76 Eastbound at Smithville on the morning
of April 25 1981, the day of the last run of #371. |
|
Number 71 looking somewhat the worse for wear. If you
look close, you can see where the truck hit, pretty much right in the middle
of the unit. February 12 1980. |
|
February 13 1980. Number 58 leading a work train, with
wrecked #71 in the middle, at Fenwick. They stopped and lifted the three
units on the left, which were the other three involved in the wreck of 71. |
|
Number 72 arriving at Port Colborne with a caboose hop. |
|
CP 1689, former TH&B 402, coupled to "belt pack"
unit 1565 at Edmonton Alberta, in the fall of 2002.
|
|
Daryl writes: "This is the wreck of 71. I was out
taking pictures that morning at Welland, in fact, of this train, but decided
to go home. Not too long after I got home, my wife's (now ex) boss, who
was on the Fonthill Fire Deptartment called and said I might want to get
my camera and head out to Weber Road. I got this photo... Fireman still
hosing down GP-7 71 about an hour after a collision with a loaded semi knocked
the locomotive into the ditch. Diesel fuel from locomotive and truck caught
fire. Both 71 and the truck destroyed. The crew survived, but the truck
driver did not. the date was February Feb 12, 1980." |
|
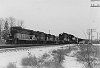
"GP-9's 403 and 401 just after crossing the Welland
River heading back to Hamilton." |
|
"GP-7 76 and GP-9's 403 and 402 Eastbound at Bayview.
Summer 1977." |
|
"GP-7 74 leads an all TH&B consist on the Port
Colborne job at Brookfield Road, just past Feeder East. Winter 1977." |